Prison Break - The Scenario
For our prison break we came up with the following scenario.
Set up
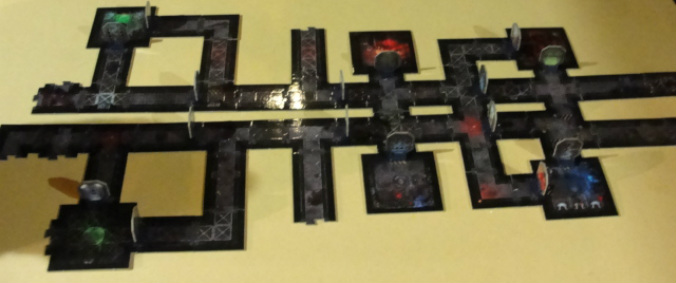
Use a set of Space Hulk to set up a prison complex representing one wing of a larger facility - the picture shows the set up we made. The key features are four prison cells at each end of the complex and two other central rooms. The two central rooms are the control centre and security station. The rooms are connected by corridors running the length of the complex, Each cell has two exits, while the control centre and security station have one. All room exits have doors (fairly obviously for a prison!) and there are other doors placed appropriately to break up lines of sight and create obstacles and tactical options. There should be at least two doors in each main corridor between the cultists' entry points and the starting positions of the central sentries (detailed below). At one end of the complex are the cultist entry points (representing air ducts, laundry chutes, holes made in the walls or similar) which are to the right of the picture above. There should be two corridors leading out of the complex in the middle of the board, while the ends of the corridors furthest from the cultist entry points are the warden/guard entry points, which are to the left of the picture (though there is a chance wardens/guards will enter from the side corridors as described below).
FORCES
The cultist force consists of the cultists that survived the last game (unless suffering from the effects of an old battle wound).
The Imperial force is made up of prison wardens and Arbite guards (the Arbites oversee the prison and are in charge, and the wardens make up the bulk of the prison staff. Wardens have the stats of a ganger and are equipped with shock-staffs (which count as a power maul which requires two hands to use). The Arbites also have the stats of a ganger, all have carapace armour, and are equipped with either shotguns, boltguns, or a pistol and close combat weapon of some kind (we used a Necromunda enforcer gang to represent the Arbites from the prison and they used whatever weapons were on the model - though they are not allowed a heavy or special weapon, or a cyber mastiff!). There is also a Chief Warden who has the stats of a leader, and is armed with laspistol and sword, and an Arbite Commander (who is in overall command of the whole prison) armed, in our case, with a power maul and plasma pistol.
At the start of the game 5 wardens and 1 Arbite start on the board as described below. In reserve are the Arbite Commander, the Chief Warden, 5 Arbites and 15 wardens.
(Note: to represent the wardens we used Imperial Guard models, with a sergeant to represent the Chief Warden. To best try to represent their two handed shock staff we only used models with bayonets attached to the ends of the models' lasguns).
DEPLOYMENT
The surviving cultists from the last game (eight in our case) are set up as close to the cultist entry points as possible. A prison warden is manning the security station, and an Arbite (with pistol and power maul in our case) is in the control centre. These models are set up in the centre of the far wall of the room opposite the door. They cannot move or otherwise act until the door to their room is opened or breached. Two further wardens are in each main corridor, one in the centre, and one at the far end section of each corridor from the cultists' entry points.
Each cell room contains 4 randomly chosen 'blip' counters from Space Hulk. When a door to a cell room is opened reveal the counters and fill the room with that many prisoner models (up to the maximum capacity of 9); this means that the cells will likely be quite full, but you can never be sure!
Each cell room contains 4 randomly chosen 'blip' counters from Space Hulk. When a door to a cell room is opened reveal the counters and fill the room with that many prisoner models (up to the maximum capacity of 9); this means that the cells will likely be quite full, but you can never be sure!
Using the Space Hulk board
To play this game and keep things as simple as possible we used all of the usual Necromunda rules, with the exception that we used the squares on the board instead of inches and a tape measure. So a model could move 4 squares or run 8 squares, a pistol had a range of 16 squares and so on. Line of sight was worked out in the same way as Space Hulk. To stop getting too stuck, we decided that models could move freely over squares which contained a model that was pinned or down, so long as they didn't end their move on the square.
SCENARIO SPECIAL RULES
This was a very unique scenario and so we created quite a few special rules to play it.
Sentries: Until the alarm is raised, the wardens in the corridors move randomly up and down their respective corridors. they will not leave the corridor they are in, nor turn down any side corridor. If they reach the edge of the board or another sentry as they move they simply stop in the last square and move no further. Each turn the Imperial player moves the sentries one at a time in any order. First pick a sentry to move and roll a D6; on a 1-2 the sentry moves D6 squares down the corridor (towards the cultist entry points), on a 3-4 the sentry moves up the corridor (away from the cultists entry points, on a 5-6 the sentry stays still. As he moves a sentry is assumed to be facing in the direction he is walking in, but after moving, roll a further D6; on a 1-3 the sentry faces down the corridor, on a 4-6 he faces up the corridor. As soon as the alarm is raised the wardens cease to be sentries and can act as normal under the Imperial player's control.
Doors: When acting as sentries the wardens move freely through the doors they are required to, and the doors close automatically behind them. Wardens and guards can always open and close any doors if they are in an adjacent square, and move freely through doors as they move, choosing as they do so to leave it open or close it behind them. Cultists and prisoners, however, do not have such freedom! Prisoners cannot open any doors at all - they do not have the codes or equipment to do so. The cultists are equipped with crowbars or other such equipment to allow them to 'force' a door. A cultist can attempt to force a door at any point during his movement phase as long as he is in an adjacent square and is not running or charging. Forcing a door does not prevent him shooting in the shooting phase. To attempt this roll a D6; a roll of 5+ means the door is successfully forced and opens immediately. Once successfully forced that door can be freely opened or closed by any model for the rest of the game.
When a door to a cell room is opened reveal the counters and fill the room with that many prisoner models (up to the maximum capacity of 9); this means that the cells will likely be quite full, but you can never be sure! The prisoners are immediately under the cultist player's control and can act from that point on. Prisoners have the stats of a ganger and no equipment (though they can still fight in combat as if armed with a single knife).
Raising the alarm: The alarm is raised if any of the following things happen:
1) A cell room door is forced if the security station has not been neutralised
2) A guard or sentry has line of sight to any cultist or prisoner model
3) A warden or guard is shot at but not taken out of action
4) A warden or guard is attacked in hand-to-hand combat but not taken out of action
5) Each time a gun is fired roll 2D6, on a roll of 10+ the alarm is raised (note do not add the strength of the gun as you normally would, we assumed the thick doors and general noise of the prisoners would muffle the sound a bit!).
Reinforcements: Once the alarm is raised more personnel enter the area to deal with the break out. If the security station is neutralised then reinforcements are summoned by shouted orders or messages communicated to other wardens nearby and D3 reinforcements enter play each Imperial turn starting a turn after the alarm is raised (it takes some time for them to get there). If the security station is not neutralised the alarm wails out throughout the prison and so D6 reinforcements enter play each turn. Note if the alarm is raised and the security station is later neutralised, the reinforcements will immediately reduce to D3 per turn from that point on. Reinforcements are randomised as follows. Roll a D6 for each reinforcement arriving; on a 5+ it is an Arbite guard, on any other result it is a prison warden. Each turn at least one warden arrives roll a D6; on a 6 one of the arriving wardens is in fact the Chief Warden. Similarly each turn at least one Arbite arrives roll a D6; on a 6 one of the arriving Arbites is the Arbite Commander. Once they have arrived you can, of course, stop rolling for them - there is only one of each! Furthermore, roll a D6 for each arriving reinforcement, on a 6 he enters play from one of the central corridors, otherwise all reinforcements enter play from the entry points at the far end of the complex. If all the Arbites reinforcements have arrived, then all following reinforcements will automatically be wardens, and vice-versa. Likewise, if the only reinforcement(s) left are the Arbite Commander and/or Chief Warden then these will automatically be the next reinforcements to arrive.
Special rooms: The control centre and security stations are manned as described above. The location is 'neutralised' immediately if the model manning them is killed. The model manning them cannot act at all unless a cultist or prisoner enters the room, but in the highly unlikely event that this happens and the manning model later leaves the room, the location will be immediately neutralised if a prisoner or cultist enters the room, and there are no guards or wardens in it. Note that once neutralised, the room can never be 'un-neutralised', even if guards or wardens later enter the room.
The security station's affects are described above (opening cell doors raises the alarm, larger numbers of reinforcements). These effects cease to apply if the security station is neutralised.
The control centre allows the doors to be controlled including, of course, the cell doors! Once neutralised, so long as you have at least one cultist or prisoner model in the control room, you can freely open and close any doors on the board during the cultists' movement phase. You can also 'lock-out' any closed doors you choose at the end of the movement phase until the start of the next cultist turn, which means that no-one, including wardens or guards, may open those doors. This is very useful for blocking guards and creating a clear escape route!
objectives
The cult is trying to escape with as many prisoners as possible. The Imperial player is trying to stop this from happening! To escape any cultist or prisoner can leave the board freely through either of the cultist entry points, or by the central corridors that lead out of the complex (it is assumed they find a way out of windows/air ducts/laundry chutes/sewer or some other means).
There is no 'win' or 'loss' as such. Just a level of success, measured by how many prisoners escape. If 0 prisoners escape the break out was a dismal failure! 0-5 escapees it is a poor result and the cult will need to reconsider its plans for the near future. 6-10 is a good result which will lend much weigh to the cult's efforts. Anything over 10 is a solid victory and if you manage to break out 20 or more you are indeed worthy of becoming a cult hero!
There is no 'win' or 'loss' as such. Just a level of success, measured by how many prisoners escape. If 0 prisoners escape the break out was a dismal failure! 0-5 escapees it is a poor result and the cult will need to reconsider its plans for the near future. 6-10 is a good result which will lend much weigh to the cult's efforts. Anything over 10 is a solid victory and if you manage to break out 20 or more you are indeed worthy of becoming a cult hero!
start of the game
The Chaos cult goes first.
The game then proceeds with the prison wardens acting as sentries in the manner described above until the alarm is raised.
The game then proceeds with the prison wardens acting as sentries in the manner described above until the alarm is raised.
End of the game
The game ends when all remaining cultists and freed prisoners have escaped, or if the only cultists and freed prisoners on the board are down. Alternatively, if all remaining cultists have escaped or are down, the cultist player can choose to voluntarily end the game, but no prisoners left on the board will count as having escaped. There are no Bottle tests in this game.
Note in the post-game sequence that models taken out of action by a power maul (and therefore also the wardens' shock staffs) do not usually suffer serious injuries.
Note in the post-game sequence that models taken out of action by a power maul (and therefore also the wardens' shock staffs) do not usually suffer serious injuries.
Experience
The cultists gain experience as follows:
Survives: Each surviving cultist gains +D6 exp
Wounding hit: Each cultist gains +5 exp for each wounding hit they inflict
Winning leader: Cult leader gains +5 exp if the cult busts out any prisoners, or +10 exp if 6 or more escape
Escape: Each cultist that escapes by leaving the board by one of the exit points gaines +5 exp
