Armoured Gauntlet - The Scenario
To top off the first section of the campaign, we created the following scenario. The cult has risen in standing and power, as well as having 'acquired' some more serious resources!
To send a serious message to the authorities as well as cause untold disruption and chaos in the organisation and operation of the administration of the world, the cult has targeted the Administratum Centre building at the heart of the city. With their stolen arsenal of tanks, including the fearsome might of a Hellhammer, can they bring the Administratum down - literally!
There is also a twist, as just as battle is about to be joined, a shimmering energy flare heralds the arrival of some unbidden reinforcements. A squad of Space Marines strides through the rubble. The Imperial forces cheer the newcomers, believing their salvation has arrived. But things may not be as they seem...
Set Up
The game is played on a board measuring 6' by 4'. Down the centre line of the board, from one short table edge to the other, is a main roadway. The road itself might be from 6"-8" wide, but there should be at least enough space down its length to allow a super-heavy Hellhammer to get through!
The most important feature of the board is a large building positioned on the long table edge, close to one of the short edges (for simplicity we'll call this the Imperial edge). This represents the main Administartum building, or perhaps just one wing of it. Either way it is the primary objective for the Chaos forces to destroy this building. For this reason the building is positioned at the end of the board with other buildings in the way so that it is hard to draw a clear line of sight to it without making way up the board. We wouldn't want the Chaos forces to have things too easy would we!
Roughly evenly spread over the rest of the board are placed 4 other key buildings (which could be city ruins as the city is consumed by riots and civil unrest and so the city may well have taken some damage). These buildings are either other parts of the Administratum complex or otherwise symbolic of the Imperium's control, so they form secondary objectives for the Chaos forces to destroy.
The rest of the board is filled with other urban scenery, minor buildings, rubble and anything else appropriate you can get your hands on. An important feature is that there should be no other clear paths for vehicles down the board except for the main roadway. There can be other possible routes, but they should entail at lest a few dangerous terrain tests. The roadway itself should be left completely clear.
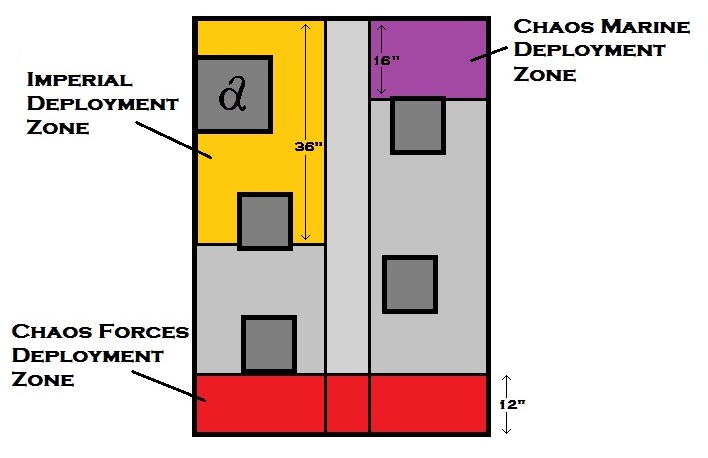
See the diagram below, which also shows the deployment zones as described below.
The most important feature of the board is a large building positioned on the long table edge, close to one of the short edges (for simplicity we'll call this the Imperial edge). This represents the main Administartum building, or perhaps just one wing of it. Either way it is the primary objective for the Chaos forces to destroy this building. For this reason the building is positioned at the end of the board with other buildings in the way so that it is hard to draw a clear line of sight to it without making way up the board. We wouldn't want the Chaos forces to have things too easy would we!
Roughly evenly spread over the rest of the board are placed 4 other key buildings (which could be city ruins as the city is consumed by riots and civil unrest and so the city may well have taken some damage). These buildings are either other parts of the Administratum complex or otherwise symbolic of the Imperium's control, so they form secondary objectives for the Chaos forces to destroy.
The rest of the board is filled with other urban scenery, minor buildings, rubble and anything else appropriate you can get your hands on. An important feature is that there should be no other clear paths for vehicles down the board except for the main roadway. There can be other possible routes, but they should entail at lest a few dangerous terrain tests. The roadway itself should be left completely clear.
See the diagram below, which also shows the deployment zones as described below.
Forces
The Chaos forces consist of all of the cultists and prisoners that have survived the previous game, and all of the vehicles that they escaped with. The number of shots remaining for each main weapon stay the same. However, we assume that the cult has had some time to attempt repairs on the vehicles and weapon systems they have acquired. Therefore roll a dice for each Weapon Destroyed result that has been suffered by any of the vehicles. On a 4+ the weapon is repaired to full working order, and the vehicle in question recovers a Hull point. Any hull points that have also been lost through other hits can also be rolled for and will be repaired on a 4+ also.
The Chaos forces can deploy however they wish, with some or all of them mounted in vehicles or manning weapon systems.The only restriction is that there must be at least one model in the position of driver in every vehicle at the start of the game.
The Chaos forces are also bolstered by a squad of Chaos Marines. This squad in our campaign is made up of Noise Marines, but it could be any other appropriate squad from Codex: Chaos Space Marines.
The Imperial forces are made up of units chosen from Codex: Imperial Guard. Add up the cost of all of the vehicles (regardless of how damaged) under the control of the Chaos forces. Then add 5 points for each cultist and prisoner they have (the cost of the Chaos Marines is not included). Round the final points cost up to the nearest multiple of 50 points. This is how many points the Imperial player has to spend on his force, using the standard Force Organisation chart as normal. (In our game we were sure to include a squad or Adeptus Arbites to continue the narrative.)
Deployment
The Imperial forces deploy first. Their deployment zone extends 36" from the Imperial edge, and up to the roadway, representing the fact that the Imperium senses the oncoming attack and has drawn up its defence around the main Administratum centre.
Secondly the majority of the Chaos forces deploy. They deploy on the other short table edge, up to 12" on to the board.
Finally, the squad of Chaos Marines deploys in their deployment area, which lies on the other side of the road to the Imperial forces, and extends up to 16" on from the Imperial edge. However, they are not set up as normal. Choose a point within the deployment zone and Deep Strike the squad using the usual rules for Deep Strike. If any model would have to be deployed without lying entirely within the deployment zone, then the squad counts as suffering a mishap. After the unit has completed the Deep Strike, the Chaos player is allowed to move each model up to 3" if they wish, in order to spread the squad out a bit. However no model may use this move to end up outside of the deployment zone. If the squad suffers a mishap for any reason, then do not roll on the mishap table. Instead the Imperial player places the unit anywhere they like within the allowed deployment zone, and the squad then counts as pinned for the first turn (even if it would normally be immune to being pinned).
Objectives
The Chaos forces are attempting to destroy the Imperial buildings, and in particular the main Administratum building.
The buildings can be destroyed using the rules as described in the Warhammer 40,000 rulebook. The Administratum building has an armour value of 13, and all the others have an armour value of 12. If the main Administratum building is destroyed the Chaos forces score 5 Victory Points. The other buildings are worth 1 Victory Point if they are destroyed. The Imperial forces score the same Victory Points for each building if they are still standing at the end of the game. Further Victory points can be earned for achieving the following:
Slay the Warlord: The Chaos forces score 1 Victory Point for killing the Imperial Warlord
Marine Killers: The Imperial forces score 1 Victory Point for wiping out the Chaos Space Marine Squad.
Deny the enemy: The Imperial forces score 1 Victory Point for destroying the Hellhammer.
The difference in Victory Points will determine the level of victory/defeat for each side, and by inference, the level of either control the Imperium has on the world, or the disorder its forces are in. This will have an affect on the campaign when the full Chaos invasion begins, so it is quite an important game and a good way to end the first section of the campaign!
Start of the Game
The forces of Chaos get the first turn.
Scenario Special Rules
Gameplay: This game steps it up a bit from the previous games. For the most part it continues to use the Necromunda rules, with the Warhammer 40,000 crossover rules for vehicles like the previous game. The cultists and prisoners continue to act independently, be subject to ammo tests, etc. The Chaos Marines and Imperial forces operate as squads, as they would do in Warhammer 40,000. To keep things simple, the Imperial forces do not roll on the Injury Table - an unsaved wound kills them outright. All squads have the Split Fire special rule, but can split their fire as many times as they like as long as they pass the relevant test. Cultist or prisoner models, or tanks under their control fire at squads instead of individuals, and casualties will be removed from the closest models as they would normally be in a game of Warhammer 40,000. Vehicles are always free to target buildings instead of enemy units.
Controlling vehicles: All of the rules for the cultists controlling the vehicles used in the last game apply, with the exception of starting the vehicles and moving out of control - it is assumed they have had time to grasp the controls a bit more competently. Should a Chaos Marine or any Imperial model end up in control of a vehicle or its weapons, they can do so with no negative effects.
Chaos Marines: This squad is immune to pinning (except if pinned by a mishap during its deployment), does not suffer ammo tests, and only an 'Out of Action' result on the Injury Table will affect them. They are equipped as their unit entry states in Codex: Chaos Space Marines. Where a weapon does not have an equivalent Necromunda profile, use its Warhammer 40,000 rules instead.
Hidden Intent: When the Chaos Marines first appear through unknown means, the Imperial forces at first assume they have come to help them fight the cultist forces. However, soon the disguise is lifted and their true allegiance is revealed - the Imperials are in trouble! Until the Chaos Marines are revealed to be Chaos forces, the Imperial forces cannot shoot or assault them, or otherwise target them with any psychic powers or any other kind of attack. The Chaos forces are revealed as soon as one or more of the following occur: the Chaos Marines shoot at any Imperial unit(s) or vehicle(s) under Imperial control and the unit(s) is not wiped out/destroyed by the attack, the Chaos Marines declare an assault against any Imperial units or a vehicle under Imperial control, any of the Chaos Marines are within 6" of any Imperial units at any time, or the Chaos player declares that they have revealed their true colours (which he can do at any time). Once revealed the Chaos Marine squad acts as a Chaos unit as normal, and can be targeted/assaulted or otherwise interacted with as an enemy unit from that point on.
End of the Game
This game uses the Random Game Length rules as described in the Warhammer 40,000 rulebook.
The game also ends if one side is completely wiped out. In this case the other side wins immediately, counting as having scored the maximum Victory Points that it could have done. The other side still scores the Victory Points it has accrued up to that point for determining the level or Imperial control/disorder for the purpose of the continuing campaign.
The game also ends if one side is completely wiped out. In this case the other side wins immediately, counting as having scored the maximum Victory Points that it could have done. The other side still scores the Victory Points it has accrued up to that point for determining the level or Imperial control/disorder for the purpose of the continuing campaign.
Experience
This game is the last game of the first part of the campaign, and is quite a bit more involved than the others so far, it is not necessary to record experience unless you really want to. However, you should make a note of how many cultists, prisoners and Chaos Marines survive the game, as it may be needed later...
